Interface Overview
Welcome to QRlogix Software! This guide introduces you to the main dashboard and all its features. Understanding the interface layout will help you navigate the software efficiently.
Watch the Getting Started Video
Dashboard Layout
The QRlogix Software dashboard is organized into several key areas:
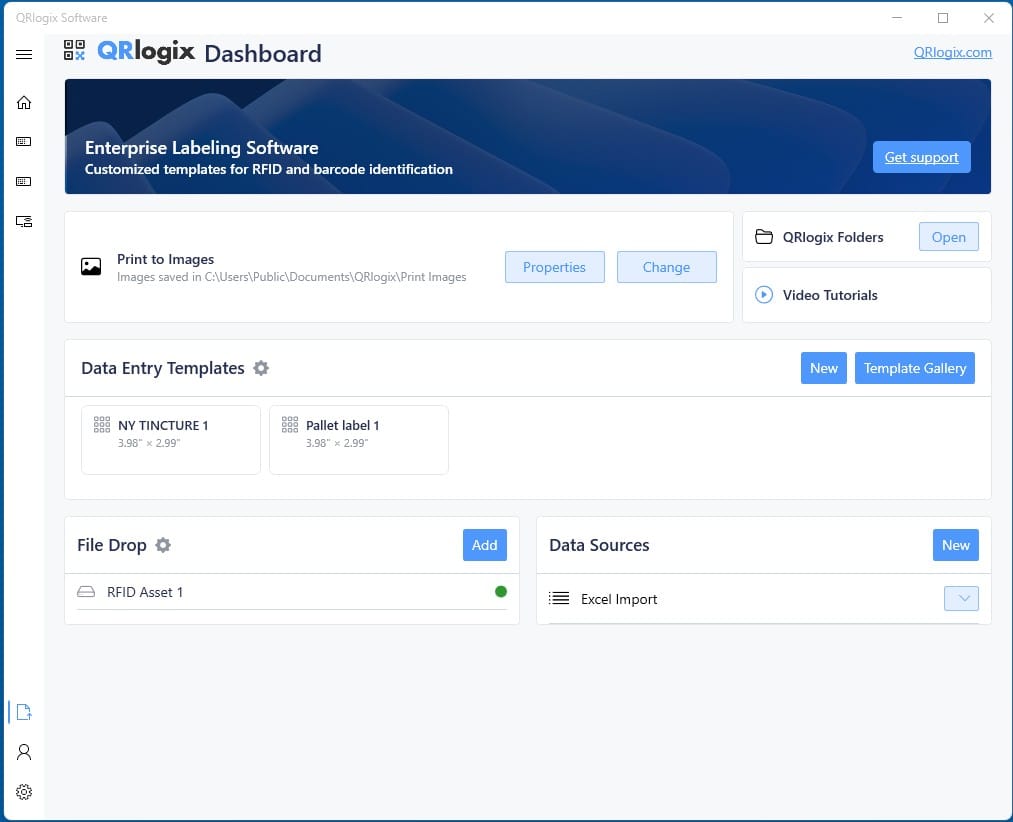
Navigation and Templates
A - Dashboard Link
Returns you to the main dashboard from anywhere in the application. Click this to go back home.
B - Pinned Templates
Quick access to your frequently used templates. Pin your most-used templates here for one-click access.
C - Pinned Data Entry Templates
Data entry templates you've pinned appear in this section. These are templates where you manually input data before printing.
D - Pinned File Drop Templates
File Drop templates you've pinned appear here. These templates automatically print from CSV or TXT files.
Printer Settings
E - Default Printer
Shows the currently active printer for all templates. This is your system-wide printer selection.
F - Printer Properties
Adjust label placement, rotation, and other printer-specific settings. Use this to fine-tune print alignment.
G - Change Default Printer
Switch between installed printers. Select which printer QRlogix will send jobs to.
Template Management
H - Template Gallery
Download ready-to-print labeling templates designed for a wide range of industries and use cases. Browse, search, and select fully customizable templates to get up and running fast.
I - New Template Setup (Data Entry)
Create a new Data Entry template from scratch. Build a template for any size label and use case.
J - New Template Setup (File Drop)
Create a new File Drop template for automated printing.
K - Connect to Data Sources
Import data from Excel spreadsheets. Connect a Data Entry template to an external data source for batch printing.
L - Import Template
Import templates shared by colleagues or downloaded from the QRlogix template library.
M - User Profile
Select or create user profiles. Multiple users can maintain separate profiles for print history analytics.
N - Setup and Preferences
- Default printer selection
- License management
- Print History
- Logs
- Support contacts
- Software Version
Getting Started with Data Entry Templates
Data entry printing allows you to input data into template forms from:
- Keyboard entry - Type information manually
- Barcode scanning - Scan data directly into fields
- Combination of both - Mix manual and scanned input
Customizing Templates
To edit form field properties:
- Open a template
- Click the Options dropdown
- Select Customize Template
This opens the Form Builder, where you can:
- Add or remove form fields
- Edit field properties
- Configure dropdown boxes
- Set up sequential numbering
- Add panels for multi-label printing
Workflow Types
Data Entry Templates
Used for:
- On-demand label printing
- Printing variable data that changes each time
- Manual data input with keyboard or barcode scanner
- Small batch printing of individual records
File Drop Templates
Best for:
- Automated printing from other systems
- Integration with LIS/LIMS
- Large batch printing
- Unattended operation
- Network printing
Need Help?
For questions about the interface or getting started:
- Phone Support: 800-650-0632
- Email Support: Support@QRlogix.com
- In-App Help: Click Support Options (F) for quick links