Folder Settings for File Drop
Folder Settings control where File Drop monitors for new print jobs and what happens to files after printing.
Accessing Folder Settings
- Open your File Drop template
- Click Settings dropdown
- Select Folder Settings


Watch Folder Configuration
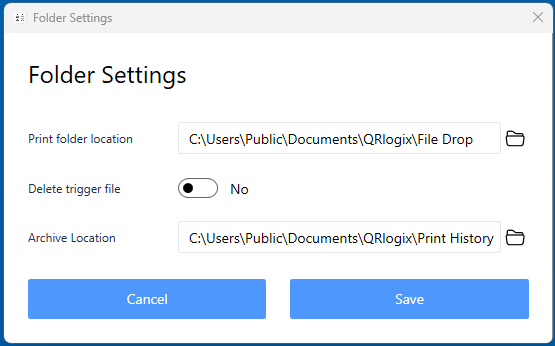
Select Folder Location
Choose the folder where print job files will be saved.

Options:
- Local folder:
C:\QRlogixPrintJobs - Network share:
\\Server\PrintShare\Lab1 - Mapped drive:
Z:\PrintQueue
Best practices:
- Use network share for multi-user environments
- Ensure folder has write permissions for sending systems
- Ensure folder has read/delete permissions for File Drop service
- Choose reliable, always-accessible location
Watch Folder Requirements
Permissions needed:
- Read - Service must read files
- Write - Systems must save files here
- Delete - Service must remove/move files after printing
Access:
- Service runs as Local System by default
- May need to configure service to run as domain user for network folders
- Test access before production use
File Management After Printing
Option 1: Delete Files
Files are permanently deleted after successful printing.
Pros:
- Keeps folder clean
- No disk space issues
- Simple management
Cons:
- No record of print jobs
- Can't reprint from history
- No audit trail
Best for:
- High-volume printing
- Limited disk space
- When LIS/LIMS keeps records
Option 2: Archive Files
Files are moved to an archive folder after printing.
Pros:
- Complete audit trail
- Can reprint from archive
- Troubleshooting history
- Compliance/record keeping
Cons:
- Requires disk space
- Need to manage archive size
- Slightly more complex
Best for:
- Regulatory compliance requirements
- Troubleshooting needs
- Audit trail requirements
- Reprint capability needed
Configuring Archive Folder
If archiving:
- Check "Archive files after printing"
- Click to select archive folder location
- Choose or create archive folder
Archive organization tips:
- Create dated subfolders (e.g.,
Archive\2026\01) - Set up automated cleanup scripts
- Monitor disk space
- Document retention policy
Configuration Examples
Basic Local Setup
Watch Folder: C:\QRlogixPrintJobsFile Management: Delete after printing Use case: Single workstation, low volume
Network Share Setup
Watch Folder: \\LabServer\QRlogixPrint\HistoFile Management: Archive to \\LabServer\QRlogixArchive\HistoUse case: Multi-user, department printing
LIS Integration
Watch Folder: \\LIS\Exports\LabelPrintFile Management: Archive to \\LIS\Archives\LabelPrint\CompletedUse case: Automated LIS printing
Testing Folder Configuration
After configuring:
- Save folder settings
- Navigate to watch folder in Windows Explorer
- Create a test TXT file with sample data
- Verify File Drop detects and processes it
- Check file is deleted or archived appropriately
Troubleshooting
Service Can't Access Folder
Symptoms:
- Files not printing
- Error in log file about folder access
Solutions:
- Verify folder path is correct
- Check folder exists
- Test folder permissions
- Try local folder first to isolate issue
Files Not Being Deleted/Archived
Symptoms:
- Files remain in watch folder after printing
- Duplicate prints occurring
Solutions:
- Check Delete/Archive setting enabled
- Verify service has delete permissions
- Check archive folder path is valid
- Review log file for errors
Network Folder Issues
Symptoms:
- Works locally but not with network share
- Intermittent failures
Solutions:
- Configure service to run as domain user
- Verify network connectivity
- Check UNC path format
- Test with mapped drive
Best Practices
Security:
- Restrict watch folder access to authorized systems only
- Use dedicated folder (don't mix with other files)
- Regular security audits
Maintenance:
- Monitor archive folder size
- Implement cleanup policy
- Document folder locations
- Back up critical archives
Performance:
- Use local or fast network drives
- Avoid cloud-synced folders
- Keep watch folder empty (auto-process)
- Separate folders per template if high volume
Next Steps
After configuring folders:
- Configure Data Settings - Map your data fields
- Design Label Layout - Create label
- Test Configuration - Verify it works
Need Help?
- Phone: 800-650-0632
- Email: Support@QRlogix.com
Related Articles: