Editing Form Fields
Once you've added form fields to your template, you can edit their properties to fine-tune behavior and appearance. This guide covers detailed settings for each field type.
Accessing Field Settings
To edit a form field:
- Open your template
- Click Options → Customize Template
- In Form Builder, click the field you want to edit
- The field settings panel opens
- Make your changes
- Click Save
Text Field Properties
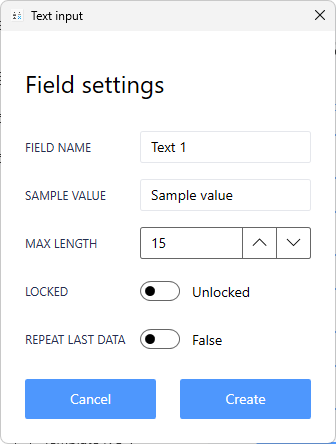
Field Name
The label displayed on the template form.
Example: "Case Number", "Patient Name", "Specimen ID"
Tips:
- Keep names short but descriptive
- Use terminology familiar to your staff
- Avoid special characters
Sample Value
The example data shown in Label Builder preview.
Important: Use realistic sample data that represents actual length and format.
Good Examples:
- Case numbers: "S23-12345-A1"
- Names: "SMITH, JOHN"
- Dates: "01/25/2026"
Max Length
Maximum number of characters that will print on the label.
How it works:
- Data exceeding max length is truncated (cut off)
- Helps prevent text from overflowing on labels
- Set based on available label space
Example: Max Length = 15
- Input: "S23-12345-A1-Block1"
- Prints: "S23-12345-A1-Bl" (truncated at 15 characters)
Locked
When enabled, field data is retained between print jobs and cursor skips this field during data entry.
Use when:
- Data rarely changes (department, technician, date)
- Multiple labels share the same value
- You want to speed up data entry
Repeat Last Data
When enabled, field automatically fills with the previous value after printing.
Difference from Locked:
- Locked = can't change without unlocking
- Repeat = auto-fills but can be changed
Best for: Fields that often repeat but occasionally change
Numeric Field Properties
Field Name
Label shown on the form (e.g., "Slide Number", "Block Count", "Accession")
Sample Value
Example number for preview. Should represent typical data.
Auto-Increment
Automatically increases the number by 1 after each print job.
Example:
- Start: 1001
- After Print: 1002
- After Print: 1003
Perfect for:
- Accession numbers
- Sequential case numbers
- Daily counters
Locked
Retains the number and cursor skips field during data entry.
Repeat Last Data
Auto-fills with the previous number (can be manually changed).
Leading Zeros
Pads numbers with zeros to reach a specific digit count.
Settings:
- Number of Digits: Total digits to display
Examples:
- 3 digits: 001, 002, 003
- 4 digits: 0001, 0002, 0003
- 5 digits: 00001, 00002, 00003
Best for: Maintaining consistent number formatting
Dropdown Box Properties
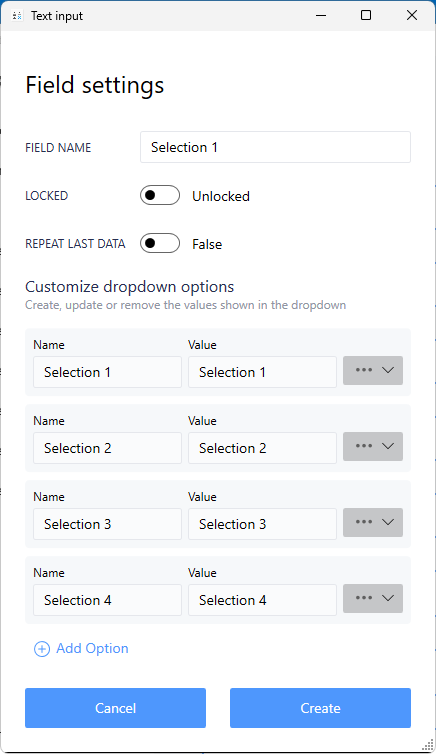
Field Name
Label for the dropdown (e.g., "Stain", "Department", "Technician")
Locked
Retains the selected value between print jobs.
Repeat Last Data
Auto-selects the previously chosen option.
Customizing Dropdown Options
Each dropdown option has:
Name: What appears in the dropdown menu Printed Value: What prints on the label (can be different)
Example:
- Name: "Hematoxylin & Eosin (Full name for clarity)"
- Printed Value: "H&E" (Abbreviated for label space)
Managing Options
Add New Selection:
- Click Add Option or +
- Enter name and printed value
- Save
Edit Existing:
- Click the selection to edit
- Modify name or printed value
- Save
Reorder Options:
- Click Move Up or Move Down
- Arrange in preferred order
- Most common selections at top recommended
Remove Option:
- Select the option
- Click Remove or Delete
- Confirm
Panels (Protocols) Properties

Panel
A group of selections where each selection prints on its own label.
How it works:
- User selects a panel from dropdown
- Software prints one label for each selection in that panel
- Each label includes specimen data + one panel selection
Panel Selections
Individual values that print when the panel is selected.
Example - IHC Panel:
- Panel Name: "Breast Markers"
- Selections: ER, PR, HER2, Ki-67
- Result: 4 labels print, one for each marker
Add New Panel
Create multiple panel groups for different workflows:
Example Configuration:
- Panel 1: "Standard IHC" → ER, PR, HER2
- Panel 2: "Melanoma Panel" → S100, HMB45, MelanA
- Panel 3: "Lymphoma Panel" → CD20, CD3, CD5, CD10
Add Option
Add individual selections to a panel:
- Select the panel
- Click Add Option
- Enter the selection name
- Save
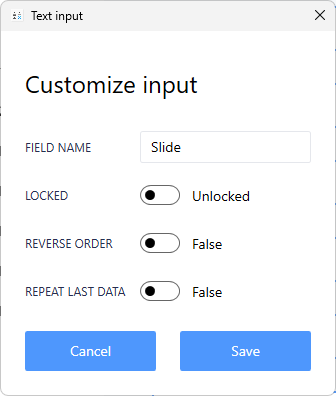
Sequential Letters Properties

Field Name
Label shown on form (e.g., "Specimen Letter", "Part Letter")
Sample Value
Starting letter for preview (typically "A")
Max Length
Maximum characters to display.
Locked
Retains the starting letter between print jobs.
Reverse Order
Prints labels in reverse order (bottom to top instead of top to bottom).
Use cases:
- Some printers or workflows need reverse order
- Helps with specific label organization needs
Repeat Last Data
Remembers the last starting letter used.
Sequential Numbers Properties

Field Name
Label shown on form (e.g., "Slide Number", "Section Number")
Sample Value
Starting number for preview (typically "1")
Locked
Retains the starting number between print jobs.
Reverse Order
Prints in descending order instead of ascending.
Example:
- Normal: 1, 2, 3, 4, 5
- Reverse: 5, 4, 3, 2, 1
Repeat Last Data
Remembers the last starting number.
Leading Zeros
Pads numbers with zeros.
Example (3 digits):
- 001, 002, 003 instead of 1, 2, 3
Reverse Print Order
Controls the physical order labels are printed.
Field Name
Usually "Reverse Print Order" (system field)
Locked
Retains the reverse setting between print jobs.
Reverse Order
When enabled, prints labels in opposite order.
Typical Use:
- Adjust for printer stacking behavior
- Match lab workflow requirements
- Ensure labels come out in the right order
Repeat Last Data
Remembers the last reverse setting.
Configuration Best Practices
Sample Values
Always use realistic samples that match:
- Typical data length
- Expected format
- Actual character types
Max Length Settings
- Test with longest expected values
- Leave small buffer for variations
- Consider label space carefully
Locked vs. Repeat Last Data
- Lock = faster for truly constant data
- Repeat Last Data = better for frequently repeated but occasionally different data
Auto-Increment Setup
- Start at appropriate number for your workflow
- Consider existing numbering systems
- Test counter behavior before production use
Dropdown Organization
- Most frequent selections at top
- Logical grouping (alphabetical or by usage)
- Clear, unambiguous names
Testing Your Changes
After editing fields:
- Click Save to apply changes
- Return to template form
- Enter sample data in each field
- Check label preview
- Print test labels
- Verify all fields behave as expected
Next Steps
- Template Properties - Configure template-level settings
- Lock/Unlock Form Fields - Workflow optimization
- Label Builder Tutorial - Design your label
- Barcode Reader Setup - Integrate scanners
Need Help?
Questions about field settings?
- Phone Support: 800-650-0632
- Email Support: Support@QRlogix.com
- Video Tutorial: Form Builder
Related Articles: