Customizing Template Forms
The Form Builder allows you to customize template forms by adding, removing, and configuring different types of form fields. This guide covers all available field types and their settings.
Accessing Form Builder
To customize a template form:
- Open an existing template
- Click the Options dropdown
- Select Customize Template
The Form Builder window opens, showing your current form fields and Label Builder preview.
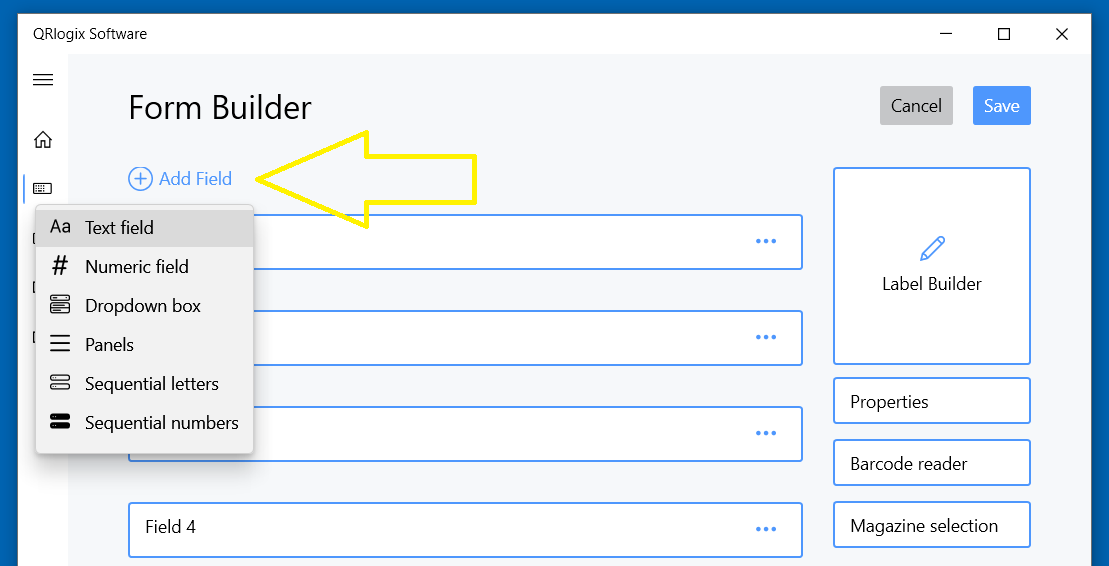
Adding Form Fields
To add a new field to your template:
- Click Add Field at the top of the Form Builder window
- Select the type of field you want to add
- Configure the field settings
- Click Create or Save
Available Field Types
Text Field
For alphanumeric data entry (case numbers, names, descriptions).
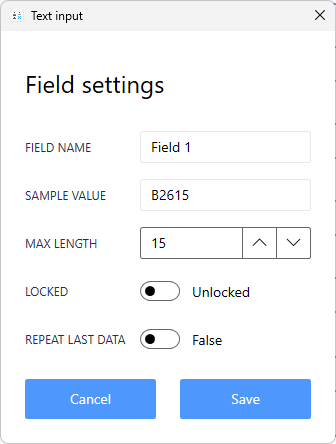
Settings:
- Field Name - Label shown on the form
- Sample Value - Example data for preview
- Max Length - Maximum characters (data will be truncated)
- Locked - Lock field to retain data between prints
- Repeat Last Data - Auto-fill with previous value
Best for: Case numbers, specimen IDs, patient names, descriptions
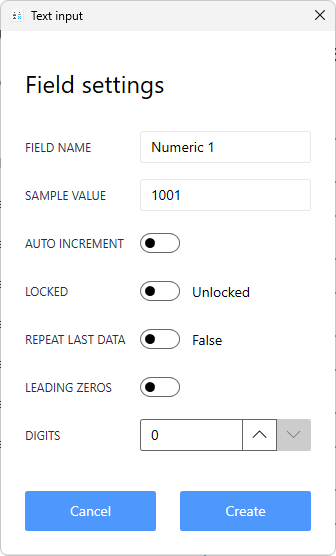
Numeric Field
For numbers only, with optional auto-increment and leading zeros.
Settings:
- Field Name - Label shown on the form
- Sample Value - Example number for preview
- Auto-Increment - Automatically increase after each print
- Locked - Lock field to retain data
- Repeat Last Data - Auto-fill with previous value
- Leading Zeros - Add zeros (e.g., 001, 002, 003)
Best for: Accession numbers, slide counts, serial numbers
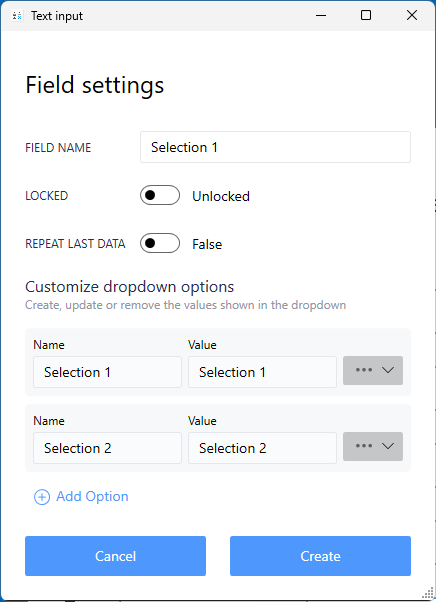
Dropdown Box
For selecting from predefined options (stains, departments, technicians).
Settings:
- Field Name - Label shown on the form
- Locked - Lock to retain selection
- Repeat Last Data - Remember last selection
- Options List - Add/edit/reorder selections
Customizing Options:
- Add new selections
- Edit selection names and values
- Move options up/down to reorder
- Remove unused options
Best for: Stains, fixatives, departments, technician lists, protocols
Panels (Protocols)
For printing multiple labels with different values from a group.
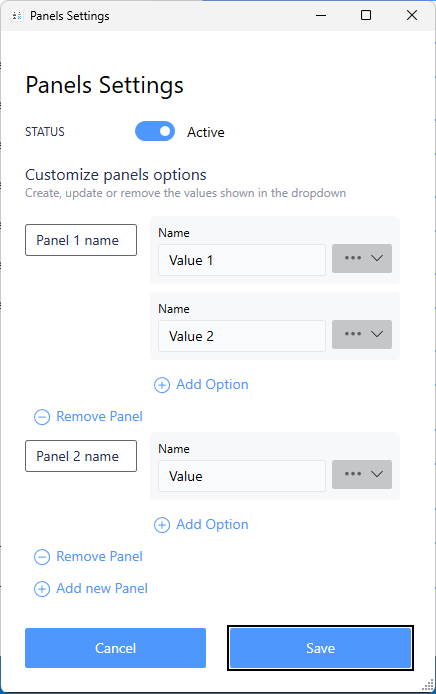
Settings:
- Panel Name - Group name (e.g., "IHC Panel", "Standard Stains")
- Panel Selections - Individual values to print
- Add New Panel - Create additional panel groups
- Add Option - Add values to the panel
How It Works:
- Select a panel, and one label prints for each selection in that panel
- If panel has 5 selections → 5 labels print
- Each label shows the specimen data + one panel selection
Best for: IHC panels, stain sets, multi-test protocols
Example:Panel: "IHC Breast" Selections: ER, PR, HER2, Ki-67 Result: 4 labels print, one for each marker
Sequential Letters
For printing labels with sequential letters (A, B, C, etc.).
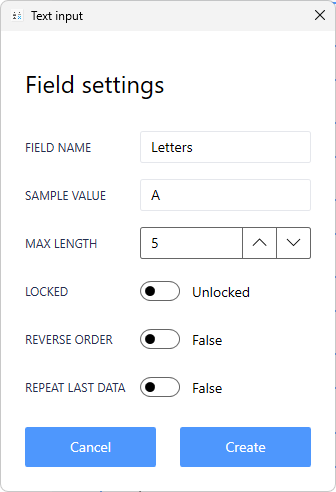
Settings:
- Field Name - Label shown on form
- Sample Value - Starting letter for preview
- Max Length - Character limit
- Locked - Lock field to retain data
- Reverse Order - Print in reverse (Z to A)
- Repeat Last Data - Remember last value
Best for: Specimen letters (Part A, Part B), block letters
Sequential Numbers
For printing sequentially numbered labels.
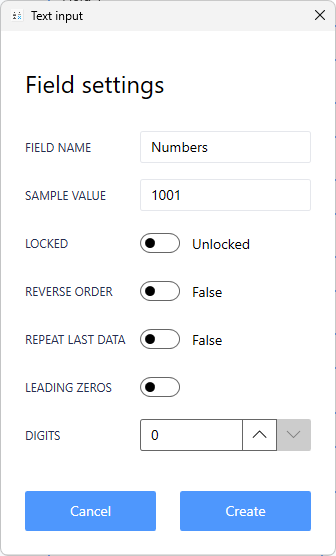
Settings:
- Field Name - Label shown on form
- Sample Value - Starting number for preview
- Locked - Lock field to retain data
- Reverse Order - Print in reverse (high to low)
- Repeat Last Data - Remember last value
- Leading Zeros - Add zeros (001, 002, etc.)
Best for: Slide numbers, section numbers, level counts
Field Organization
Reordering Fields
To change field order on the form:
- In Form Builder, click and drag fields
- Move up or down to desired position
- Save changes
Fields appear on the form in the order shown in Form Builder.
Removing Fields
To delete a field:
- Click the field in Form Builder
- Click Remove or Delete
- Confirm the deletion
Warning: Removing a field also removes it from the label design.
Field Configuration Tips
For Efficient Workflow
Lock repetitive data:
- Lock fields that rarely change (department, technician, date)
- Cursor will skip locked fields during data entry
Use repeat last data:
- Enable for fields that often repeat
- Saves time re-entering common values
Set appropriate max lengths:
- Match your label space
- Prevent overly long data from crowding labels
Sample Values Matter
Always use realistic sample data:
- Similar length to actual data
- Representative characters
- Helps visualize final label accurately
Good: "S23-12345-A1" (realistic case number) Bad: "Test" (too short, not representative)
Form Design Best Practices
Keep It Simple
- Only add fields you actually need
- More fields = more clicks per label
- Consider workflow efficiency
Logical Order
- Arrange fields in data entry order
- Group related fields together
- Most important fields at top
Consistent Naming
- Use clear, descriptive field names
- Match your workflow terminology
- Avoid abbreviations that aren't obvious
Test Thoroughly
- Print test labels with sample data
- Verify all fields work as expected
- Check label preview accuracy
Common Form Configurations
Basic Slide Template
- Case Number (Text)
- Specimen Letter (Sequential Letters or Dropdown)
- Block Number (Numeric)
- Slide Number (Sequential Numbers)
- Stain (Dropdown)
IHC Protocol Template
- Case Number (Text)
- Specimen ID (Text)
- Panel Selection (Panels)
- Date (Text with repeat)
- Technician (Dropdown)
Research Template
- Study ID (Text)
- Subject Number (Numeric with auto-increment)
- Specimen Type (Dropdown)
- Collection Date (Text)
- Slide Count (Sequential Numbers)
Next Steps
After customizing your form:
- Edit Form Field Properties - Fine-tune individual fields
- Lock/Unlock Fields - Optimize data entry
- Design Your Label - Add fields to label
- Barcode Reader Setup - Integrate scanners
Need Help?
Questions about form customization?
- Phone Support: 800-650-0632
- Email Support: Support@QRlogix.com
- Watch Video: Form Builder Tutorial
Related Articles: